How to Install Minecraft Mods: 7 Steps to Install Modpacks

By Fernando Raymond | February 13, 2021
For those who are looking for more ways to make Minecraft even bigger, the answer is in the installation of mods!
Minecraft’s popularity hinges on the highly customizable features and gameplay which have paved the way for an onslaught of modifications to the game’s performance and the player in a number of ways. Mods serve as additions that help to expand what you can do in Minecraft, from completely altering the game’s core mechanics to even things like changing the color of all the pigs.
Also read: Minecraft Customization Guide: How to Edit Your Skin in Minecraft!
Mods can be a lot of fun, and help to bring new life into the game that people have been playing for about a decade now.

In fact, Minecraft is the kind of game you’ll play for years with mods installed, as the game is continually reinvented with new layers of content and complexity.
How to Prepare before modding your game
There are quite some few things you’ll need to do before modding your game, because the mods exert more demand on your computer than the base game would, so it requires a little of know-how to safely work with mods. These simple checks will help to get you started:
- Check your PC’s storage: As said before, mods take up additional space on your computer, therefore it requires PC with amble storage.
- Your PC’s graphics: Make sure your computer can handle mods, as a modern laptop or desktop computer with medium to high graphics should be just fine.
- Ability to change file names and downloading external programs: Make sure you’re comfortable doing these on your computer.
Finally, you should note that this guide is based on Minecraft Java Edition, as mods don’t work with the Bedrock version of Minecraft, so you’ll need the original program installed on your computer to make the mods work. You can get it directly from Mojang for $27, that is, if you don’t have it already on your computer. But first, you’ll need to create account with Mojang.
7 Steps to Install Minecraft Mod to Your Game
First, we need to emphasize the importance of having a good backup, as unlike the resource packs, installing mods actually changes the game. And most times this change goes well and introduces super awesome features to Minecraft, but very rarely you can get your software corrupted, permanently altering a game you’ve been working on, could be an unpleasant experience.
Step 1: Getting the Mods
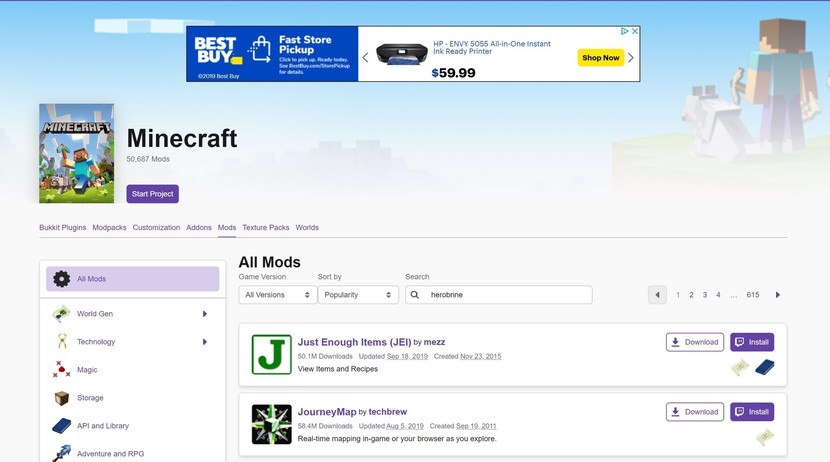
The best places to get mods include the Official Minecraft Forums, which just like the resource packs, the biggest authority and the best place to find the most up-to-date stuff is the official Minecraft forums.
While the Minecraft Mapping and Modding forum is always bustling with updated mods of all sizes.
Another popular source is PlanetMinecraft: Are you looking for good for skins, resource packs, server listings, and of course, mods, look no further. You can sort them by new, what’s hot, most looked at, most popular, and the most downloaded, as well as category and game version.
Step 2: Installing Forge Mod Loader
For the purpose at hand, we’re going to go right into the installing of the mod loader. The official Forge website serves as a file storage for the Forge community.
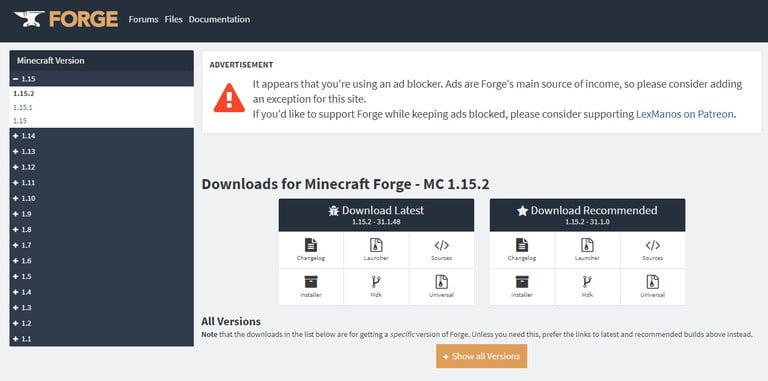
You can use Forge without needing to register for the discussion forum but in rare cases that you run into any problem that is not solved by searching the numerous posts, you’ll have to start your own discussion topic which requires a registered account.
You should note that not all mods are compatible with all the versions of Minecraft, or Forge. So make sure to research for the specific mod to find out if it’s suitable with your software.
And the Forge program for Minecraft: Java Edition is built off of Java. So, to install it, you’ll first need to have Java installed on your computer.
Step 3.: Select the destination for the Minecraft Launcher
After the installation process, the next screen allows you to select the destination for Minecraft Launcher. While the default is perfect, you can always change it.
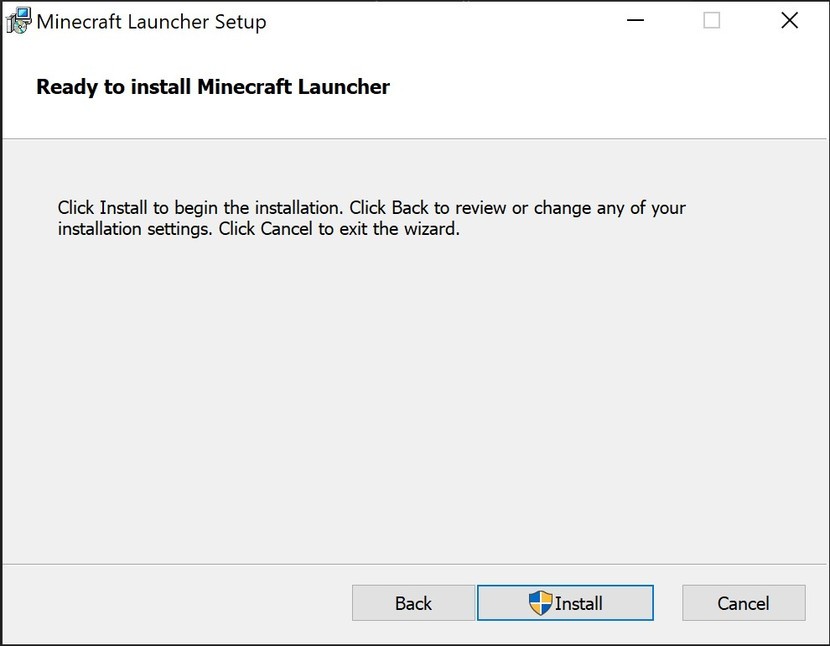
Now, click to install. Windows will ask you to confirm that you accept the Minecraft Launcher making changes to your system. You’ll need to give a consent to that confirmation.
If perhaps, the Minecraft Launcher failed to start automatically, you can find it in your Apps list from the Start Menu to open it.
Step 4: Moving the file into the Minecraft folder
To run Minecraft, first make sure your Forge account is active. If not, your mods would not load properly.
Assuming you’ve already purchased the Java Edition of Minecraft, you can now install it by heading to Mojang’s website and clicking on the “Download” button.
Step 5: Navigate to the Download folder on your PC
Then, navigate to the Download folder on your PC to find the file labeled “MinecraftInstaller.” Double-click this file to begin the installation process.
If everything works accordingly, you can now move out of the game and close it. And move to installing Forge, which program you’ll need to manage your mods.
Step 6.: Move the Mods into your mods folder
Installation of mods require that Minecraft has run on your computer at least once to finish installing the necessary files.
If the folder isn’t inside your .minecraft folder, simply create new folder and name it “mods.” The mods you download will have to be moved to this new folder.
Now that the mods are in your mods folder, you can simply launch Minecraft with the version of Forge loaded on your profile.
Step 7: Launch Minecraft with version of Forge loaded
Now it’s time to launch Minecraft with that version of Forge loaded as your profile.
Congratulations, you have successfully installed mod for Minecraft: Java Edition. And it’s time to begin playing with mods and enjoy better gameplay experience.
To ensure you have a smooth sailing, while you can run multiple mods, as there’s nothing wrong with matching different types of mods. But if you’re having issues with your game on multiple mods, try to disable the mods one at a time.
Conclusion
If you followed the above steps diligently, you’d be on your way to enjoying a whole new experience of Minecraft. As Mods help to greatly expand the already expansive Minecraft world, and modding your game can result to a thousand more engaging hours into the game!
And perhaps, if you are a new comer to Minecraft, you should play Minecraft online for free to get your multiple player experience. So that you can experience the SeekaHost Game servers and the performance before buying your own minecraft server hosting.
Author Profile
- Founder & CEO - SeekaHost
Latest entries
 OtherNovember 10, 2021Minecraft Conversion Guide: What You Need to Know before Switching from Minecraft Java to Bedrock
 Minecraft Playing TipsOctober 31, 202115 Best Minecraft Seeds: How to Pawn for the best Adventures
 OtherAugust 18, 202115 Minecraft Vocabulary Words You need to Get Started on Your Minecraft Adventure
 Minecraft Playing TipsAugust 5, 202110 Best Minecraft Maps & Where to get the best Minecraft Adventure Maps
