How To Safely Transfer Your Server Files To an Updated Version

By James Flarakos | August 1, 2023
Table of Contents
In this article we find out how to safely update your server to a new version with the same world and plugins. So bring your 1.19 server into the 1.20th + century!
Problems with Updating Minecraft Server Files
So first lets explain some problems that people encounter when updating servers.
First, its confusing when you are not sure what file does what. As your server can hold many files and folders. All of which as either essentials or hardly needed making it harder to guess what to update, or bring over with you to the updated version.
So the first problem people may encounter is not bringing the right folders over, too many folders or mixing folders up. So lets go through the importance of and details of the files and folders first. We will do this for a Java server.
An important thing to remember that is server hosting will try to create any missing folders when the server starts. So if you upload everything but the plugins folder. A new and default plugins folder will be created for you.
Java Server File and Folders
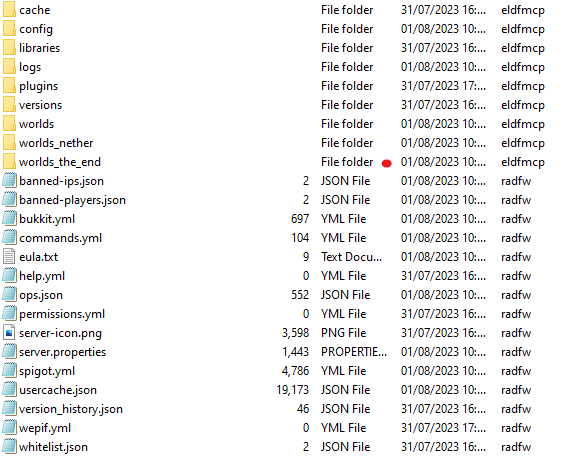
Cache – Medium
Here we have the version cache of the current version you are using. This folder is created after you start a new server and is automatically created.
For server updates and transfer i dont normally bring this folder
Config – High
This is important to bring over as it has your current saved configurations. So they way you have set your server e.g. server settings and other configuration will be here. By not bringing this over to the updated server you will start with default settings as the folder will be created as default.
Libraries – Medium
Libraries have all the information for your Minecraft version. This is often a heavy folder, especially if you use via plugins as they need to have more libraries ready.
These will also be created once you start a new server version or update your existing one. So unless you made specific changes to it, you dont need to transfer your old libraries to your new server. they will simply be created from scratch.
Logs – Low
Logs will simply log activities or errors on your server in a viewable txt document. I dont normally bring these over with me, unless you have an error you want to check from the past. They aren’t that useful and your new server will create this folder from fresh once you start running your world.
Plugins – High
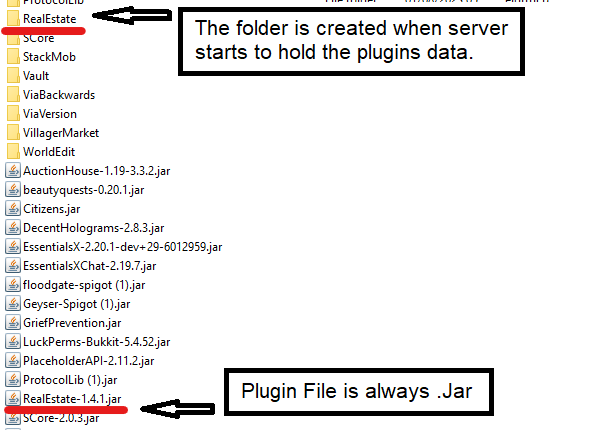 This folder contains the plugins themselves (as .jar files) and then the relative folders they create with the plugin data as well. Now the reason i have put this as high is because if you dont transfer this it will just create an empty plugin folder.
So first you need to check your plugins are compatible with the newest version and update the .jar file accordingly to have the latest plugins version. (leave the plugin folder to retain the plugin data from previous version).
Upon moving the plugin folder to the new or updated server they should all work, any that dont show up when you type in /plugins. Or show as red will either need updating or need removing.
Versions – Medium
Although this is an important folder. It is automatically created by the server hosting once the server is started in a new version so in most cases you dont need to transfer it over.
Worlds, Nether and the End – High
These are by far the most important folders. This holds your current world, your nether world and the end world data. These will need to be moved over unless you are looking to start a brand new world, nether and the end.
Banned IP’s .Json – Medium
This contains any banned IP’s from your last server. So if you have banned people by IP, I recommend bringing this over with you. otherwise it will just create a new blank file once the updated server version is started.
Banned Players .Json – Medium
This contains any banned players (by username) from your last server. So if you have banned people by username, I recommend bringing this over with you. otherwise it will just create a new blank file once the updated server version is started.
Bukkit & Spigot .Yml – Low
Here are the settings for the Spigot and Bukkit version. I have both options as im using a paper type server. You might only have 1 depending on what version you are using for you server. These are not that important to bring over to the new server as they get generated automatically. So unless you have made changes to your existing server you dont need to bring these over. If you have made changes then make sure to bring them over to the new updated server.
Commands & Help .Yml – Low
These hold you custom commands or help commands. Unless you have made any changes here there is no need to bring them over to an updated server as these get created as default if they are missing from the server on start up.
EULA .Json – Low
This is the Minecraft agreement that needs to be done on a server installation and start up. This is done automatically and there is no need to transfer this file over to an updated Minecraft server.
OP’s .Json – Medium
I would recommend bringing this file over to your new updated server. This will let the server know who you have as op’s so you dont have to go through the process of making the op players op again.
Permissions .Yml – Medium
This is only if you use the pre build bukkit permissions system. If you have used this then this is important to bring over with you to the new server after update. Otherwise it will be created as a default folder once you clear your old server and update to new.
Server-Icon .PNG – High
This is your custom server icon. If you have a server icon here then you should move it other wise your updated server will be using the default icon again when people join.
Server Properties – High
This contains all the main server settings for your current server. Bring these over to retain the same server settings. Otherwise the folder will be created as new on the new server and you will have to make the same changes again.
User Cache .Json – Medium
This can be important in most cases. So this will have specific data about players stored here. If you want you players to start a fresh however with no previous data about them on the server then you can let the server create this file automatically and not transfer it over.
Whitelist .Json – High
The reason for this being set to high is that if you use a white list, this is where the player names are stored. So if you dont bring this file over to the new server then you will have to manually whitelist all the players again.
What Files Do I Need To Tranfer?
So first, take a backup of all the files you need from the list above. As an absolute minimum i suggest the following ones for your worlds (choose your world name), configuration and plugins. I recommend using FileZilla to connect and move files and folders to your pc.
- config
- plugins (if you have plugins)
- world
- world_the_nether
- world_the_end
- server.properties
- ops.json
This one for worlds, plugins, configuration, banned users and whitelisted players.
- config
- plugins (if you have any)
- world
- world_the_nether
- world_the_end
- banned_ips.json
- banned_players.json
- whitelist.json
- server.properties
- usercache.json
- ops.json
And this one I recommend for anyone wanting to retain the maximum data from the old server to move onto the new one.
- config
- plugins (if you have any)
- world
- world_the_nether
- world_the_end
- banned_ips.json
- banned_players.json
- whitelist.json
- server.properties
- usercache.json
- bukkit & spigot .yml (if altered)
- server-icon.png
- ops.json
How to Transfer Server Files To a New Updated Server
Now we understand the importance of each part of our server files and which ones we want to bring from our backup. We follow these steps on the newer version/updated server. Alternatively if you are doing this on 1 server, then after you take the back up files simply stop the server. Delete all the current server files, save your server in the newest version and start it again.
- Stop your server (Updated to the version you want to use)
- Log into using FTP file access or FileZilla for no size limitations.
- Delete the files on the new server that you have a back up of.
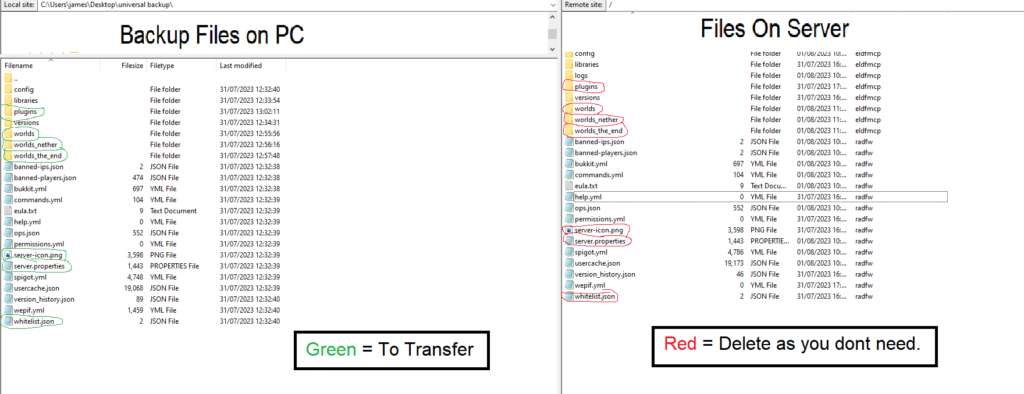
- Then move the files from your older version server onto the server side to transfer a copy to your server.
For FTP file access upload the files using the FTP upload option. - Start your server up
Conclusion
One thing you might find now is that some plugins might now have worked. For this you will need to look for the most up to date plugin and if there even is one for your version. If there is, then delete the plugins .jar only and replace with the new one.
If the plugins doesn’t have a compatible version for the server type you’re using then its time to look for another that will suit!
Author Profile
- I love to make Minecraft content, and easy quick tutorials for others to use. And you can see more video and tips at www.jdogofficial.com
Latest entries
 Minecraft ServersFebruary 23, 20255 Best Minecraft Discord Servers of 2025
 Minecraft Server FixesFebruary 22, 20255 Best Minecraft Harry Potter Servers
 Minecraft ServersFebruary 21, 20255 Best Minecraft PyroFishing Servers
 Minecraft ServersFebruary 21, 20255 Best Minecraft PyroMining Servers

